14 KiB
!!! note These are beginner's guides/installation instructions for additional platforms generously provided by users of these platforms. When in doubt, verify the details with the project README. If you see any issues here while using these instructions, please contribute.
There are several different methods to install TubeArchivist on Synology platforms. This will focus on the available docker package implementation.
Prepare Directories/Folders
Before we setup TubeArchivist, we need to setup the directories/folders. You are assumed to be logged into the Synology NAS.
1. Docker Base Folder
- Open the
File Stationutility. - Click on the Create🔽 button and choose Create New Shared Folder.
- Name the folder "Docker".
- Add a Description.
- Select the Volume Location.
Note: By default, this will be where all data is stored. Change the folders as best meets your requirements.
- Select the appropriate options from the remaining checkbox configurations.
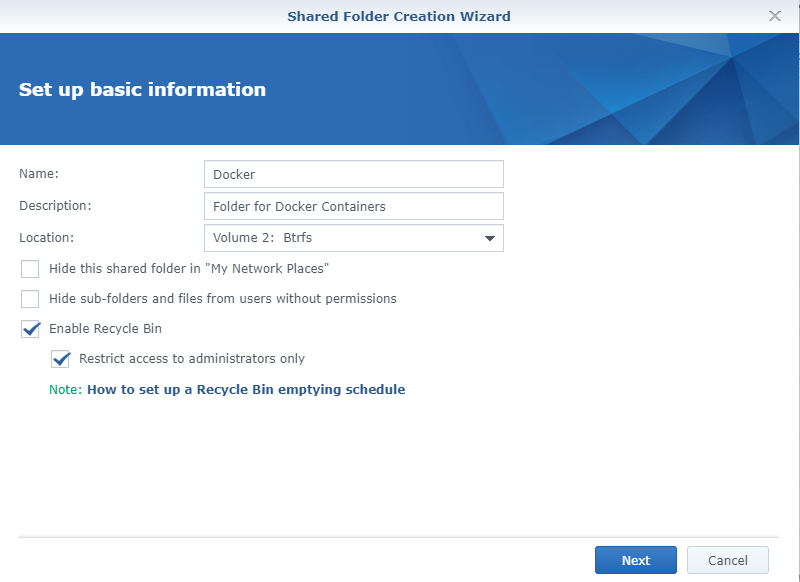
- Click the Next button.
- If you are going to Encrypt your folder, check the appropriate box and provide the Encryption Key and its confirmation.
- Click the Next button.
- On the Advanced Settings page, you can select the Enable data checksum for advanced data integrity setting. This may cause a performance impact, but will allow for potential file self-healing. This cannot be changed later.
Note: This is not recommended, as we will be hosting databases within this folder.
- If you are enabling a quota for how large the folder can get, you can select the Enabled shared folder quota setting and choose the maximum size this folder can grow. This can be changed later.
- Click the Next button.
- Confirm the settings, then click the Apply button. This will create the folder.
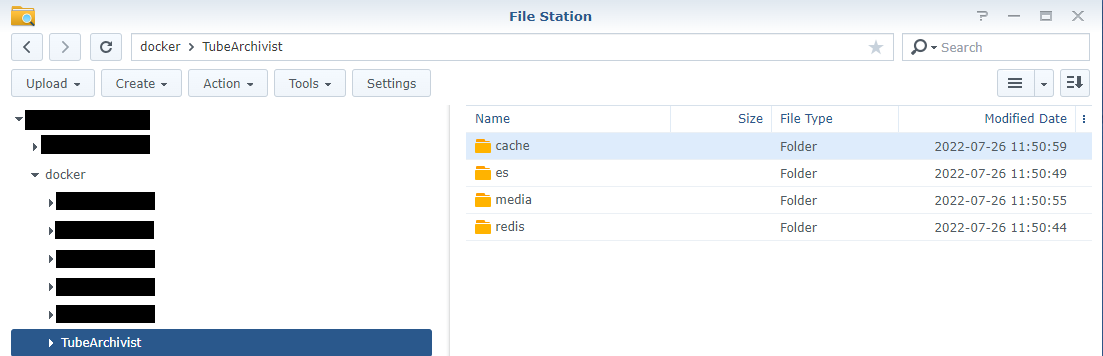
2. TubeArchivist Base Folder
- Open the
File Stationutility. - Select the "Docker" folder on the left-hand side.
- Click on the
Create🔽button and choose create Folder. - Name the folder "TubeArchivist".
3. Redis Data
- Open the
File Stationutility. - Select the "Docker" folder on the left-hand side.
- Select the "TubeArchivist" folder beneath "Docker".
- Click on the
Create🔽button and choose create Folder. - Name the folder "redis".
4. Elastic Search Data
- Open the
File Stationutility. - Select the "Docker" folder on the left-hand side.
- Select the "TubeArchivist" folder beneath "Docker".
- Click on the
Create🔽button and choose create Folder. - Name the folder "es".
5. TubeArchivist Cache
- Open the
File Stationutility. - Select the "Docker" folder on the left-hand side.
- Select the "TubeArchivist" folder beneath "Docker".
- Click on the
Create🔽button and choose create Folder. - Name the folder "cache".
6. TubeArchivist Output
- Open the
File Stationutility. - Select the "Docker" folder on the left-hand side.
- Select the "TubeArchivist" folder beneath "Docker".
- Click on the
Create🔽button and choose create Folder. - Name the folder "media".
7. Confirm Folder Structure
Once all of the folders have been created, it should have a folder structure within Docker\TubeArchivist that includes "cache", "es", "media", and "redis" folders.
8. Change Permissions - CLI Required
!!! note If you do not have SSH access enabled for CLI, enable it before continuing.
- Open the SSH connection to the Synology. Login as your primary
Adminuser, or the user that was enabled for SSH access. - Elevate your access to
root. Steps are provided here. - Change directories to the Volume where the "Docker" folder resides.
Example:cd /volume1 - Change directories to the "Docker" folder.
Example:cd Docker - Change directories to the "TubeArchivist" folder.
Example:cd TubeArchivist - Change the owner of the "redis" folder. If correct, this does not have an output.
Example:chown 999:100 redis - Change the owner of the "es" folder. If correct, this does not have an output.
Example:chown 1000:0 es - Confirm that the folders have the correct permissions.
Example:ls -hl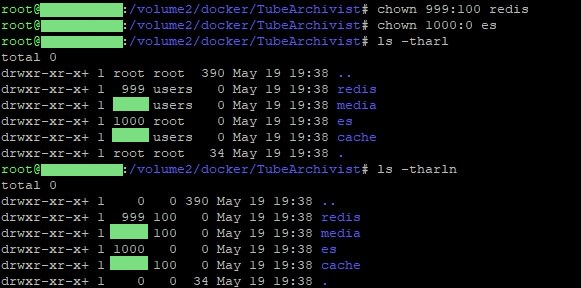
- Logout from root.
Example:logout - Disconnect from the SSH connection.
Example:exit
Synology Docker Setup
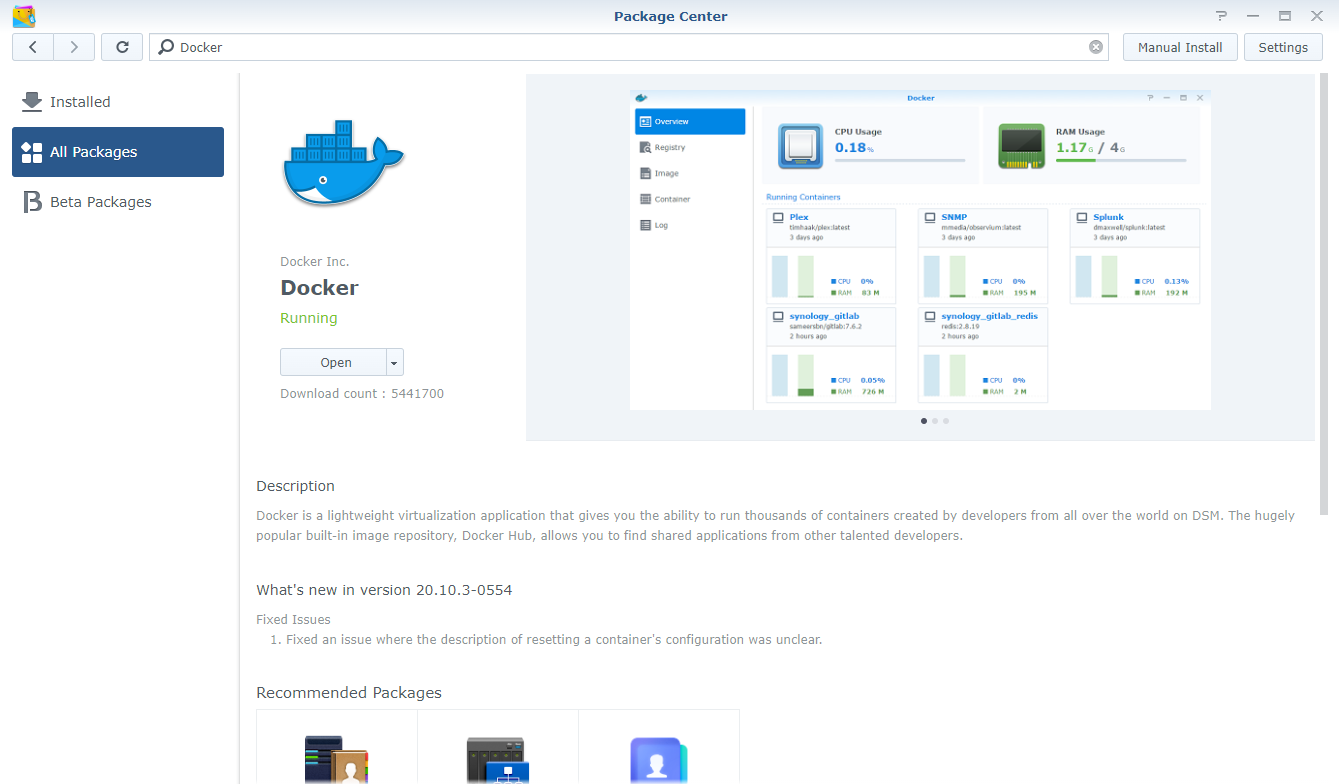
1. Install Docker
- Install the
DockerSynology Package.- Log in to your Synology NAS.
- Open the
Package Centerutility. - Search for
Docker. - Click
Install.
2. Install Docker images
- After
Dockeris installed, open theDockerutility. 3. Go to theRegistrytab. 4. Search for the followingimagesand download them. Follow the recommended versions for each of the images.redis/redis-stack-server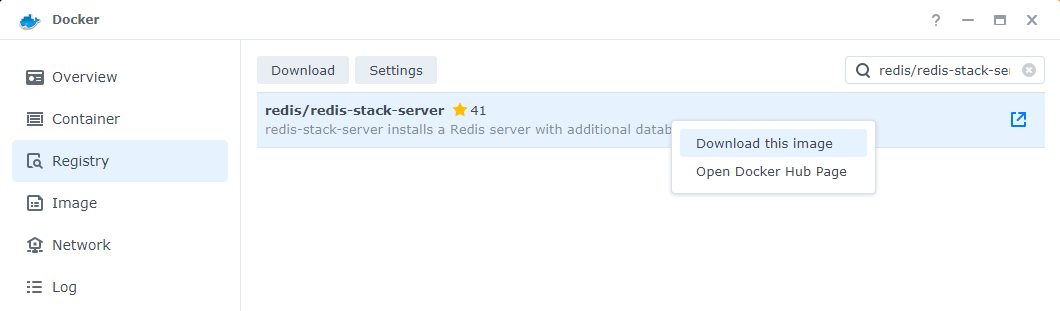
bbilly1/tubearchivist-es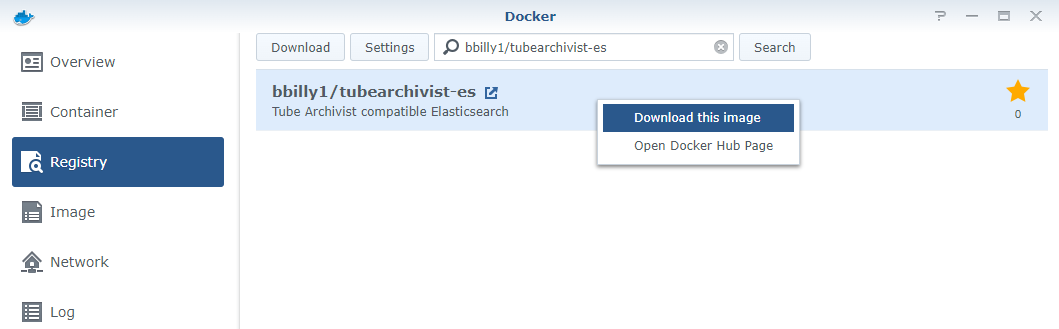
bbilly1/tubearchivist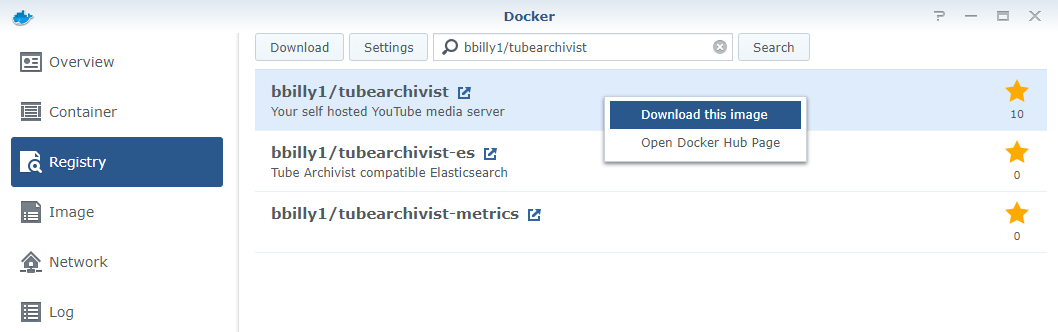
!!! note "Upgrades in Synology require use of the
latesttag."
3. Configure ElasticSearch
- Go to the
Imagetab. From here, create an container based on each image with the associated configurations below.
- ElasticSearch
- Select the associated image.
- Click the Launch button in the top.
- Edit the Container Name to be "tubearchivist-es".
- Click on the Advanced Settings button.
- In the Advanced Settings tab, check the box for
Enable auto-restart. - In the Volume tab, click the Add Folder button and select the "Docker/TubeArchivist/es" folder, then type in
/usr/share/elasticsearch/datafor the mount path. - In the Network tab, leave the default
bridgeNetwork (unless you have a specific Network design that you know how to implement). - In the Port Settings tab, replace the "Auto" entry under Local Port with the port that will be used to connect to ElasticSearch (default is 9200).
- In the Port Settings tab, select the entryline for port 9300 and ➖ delete the line. It is not needed for this container.
- The Links tab does not require configuration for this container.
- In the Environment tab, add in the following ElasticSearch specific environment variables that may apply.
discovery.type=single-nodeES_JAVA_OPTS=-Xms512m -Xmx512mUID=1000GID=0xpack.security.enabled=trueELASTIC_PASSWORD=verysecretpath.repo=/usr/share/elasticsearch/data/snapshot!!! note "BE AWARE" - Do not use the default password as it is very insecure. - Activating snapshots for backups should only be done after setting the
path.reposetting.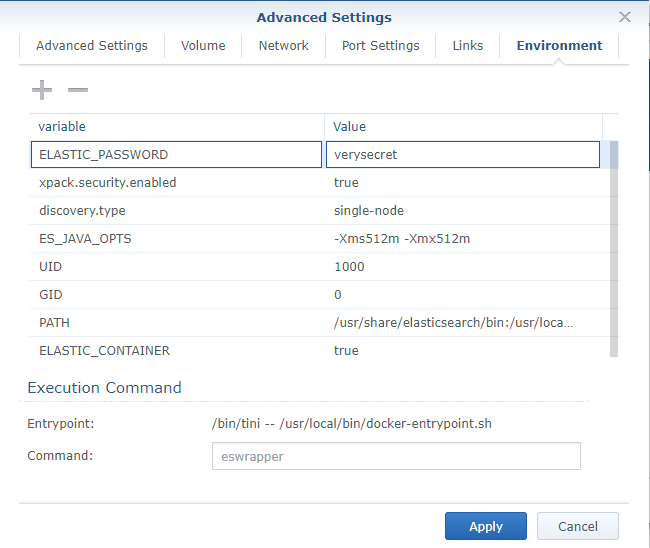
- Click on the Apply button.
- Back on the Create Container screen, click the Next button.
- Review the settings to confirm, then click the Apply button.
4. Configure Redis
- Select the associated image.
- Click the Launch button in the top.
- Edit the Container Name to be "tubearchivist-redis".
- Click on the Advanced Settings button.
- In the Advanced Settings tab, check the box for
Enable auto-restart. - In the Volume tab, click the Add Folder button and select the "Docker/TubeArchivist/redis" folder, then type in
/datafor the mount path. - In the Network tab, leave the default
bridgeNetwork (unless you have a specific Network design that you know how to implement). - In the Port Settings tab, replace the "Auto" entry under Local Port with the port that will be used to connect to Redis (default is 6379).
- In the Links tab, select the "tubearchivist-es" container from the Container Name dropdown and provide it the same alias, "tubearchivist-es".
- In the Environment tab, add in any Redis specific environment variables that may apply (none by default).
- Click on the Apply button.
- Back on the Create Container screen, click the Next button.
- Review the settings to confirm, then click the Apply button.
5. Configure TubeArchivist
-
Select the associated image.
-
Click the Launch button in the top.
-
Edit the Container Name to be "tubearchivist".
-
Click on the Advanced Settings button.
-
In the Advanced Settings tab, check the box for
Enable auto-restart. -
In the Volume tab, click the Add Folder button and select the "Docker/TubeArchivist/cache" folder, then type in
/cachefor the mount path. -
In the Volume tab, click the Add Folder button and select the "Docker/TubeArchivist/media" folder, then type in
/youtubefor the mount path. -
In the Network tab, leave the default
bridgeNetwork (unless you have a specific Network design that you know how to implement). -
In the Port Settings tab, replace the "Auto" entry under Local Port with the port that will be used to connect to TubeArchivist (default is 8000).
-
In the Links tab, select the "tubearchivist-es" container from the Container Name dropdown and provide it the same alias, "tubearchivist-es".
-
In the Links tab, select the "tubearchivist-redis" container from the Container Name dropdown and provide it the same alias, "tubearchivist-redis".
-
In the Environment tab, add in the following TubeArchivist specific environment variables that may apply. Change the variables as is appropriate to your use case. Follow the README section for details on what to set each variable. -
TA_HOST=synology.local-ES_URL=http://tubearchivist-es:9200-REDIS_HOST=tubearchivist-redis-HOST_UID=1000-HOST_GID=0-TA_USERNAME=tubearchivist-TA_PASSWORD=verysecret-ELASTIC_PASSWORD=verysecret-TZ=America/New_York> !!! note "BE AWARE" - Do not use the default password as it is very insecure. - Ensure that ELASTIC_PASSWORD matches the password used on the tubearchivist-es container.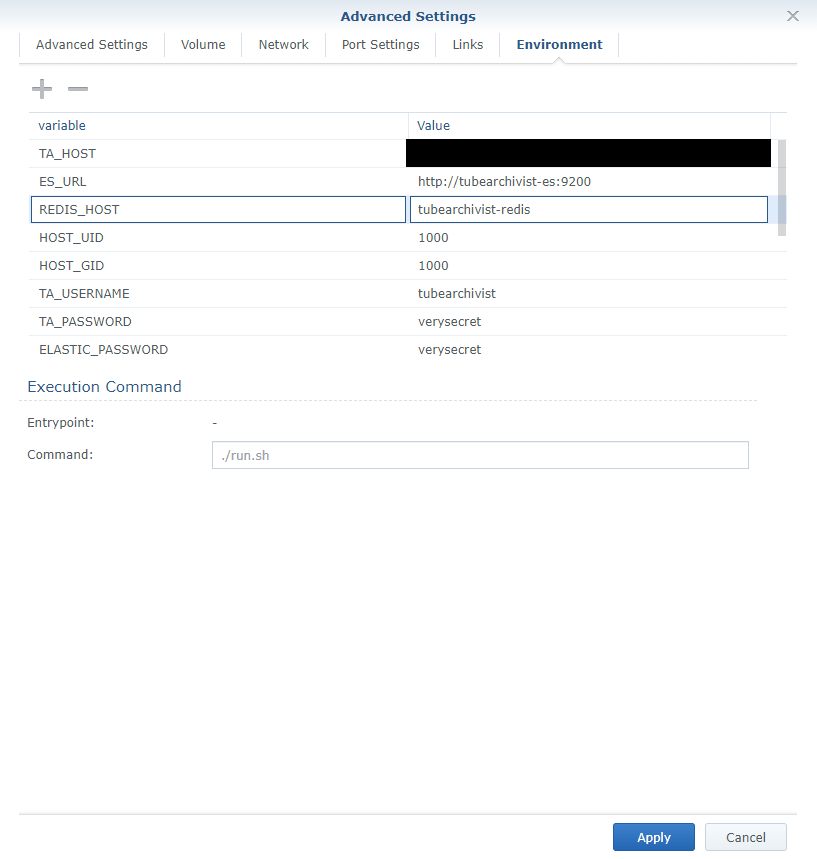
-
Click on the Apply button.
-
Back on the Create Container screen, click the Next button.
-
Review the settings to confirm, then click the Apply button.
-
After the containers have been configured and started, you can go to the Container tab and monitor the containers.
-
To review the logs to ensure that the system has started successfully, select the "tubearchivist" container and click on the Details button. In the new window, go to the Log tab. Monitor the logs until either an error occurs or the message
celery@tubearchivist ready.is in the logs. This may take a few minutes, especially for a first time setup.!!! note Synology Docker presents the logs in a pagination format. If you are not seeing the logs update, check if there are additional pages.
-
After it has started, go to the location in the
TA_HOST. This should give you the standard TubeArchivist login screen.
From there, you should be able to start up your containers and you're good to go!
Synology Docker Upgrade
When a new version of the image is available, you can follow the following steps to more easily upgrade your previous instance.
!!!note "If you did not use the latest tag, you may have some variances in your upgrade steps. Those are detailed below these instructions."
- Go to the Registry Tab and download the newest instance of the
:latesttag, as seen in the Installation Instructions earlier. - Go to Image Tab and confirm that you have the newer version available.
- Stop the running
tubearchivistcontainer. - Click on the Action🔽 button and choose "Reset".
- This will load the newer image we downloaded earlier. This should not delete any files if all of your volumes were setup correctly.
- If it doesn't start automatically, start the
tubearchivistcontainer. Monitor the upgrade in the logs and confirm that the service starts up successfully. - Once you are able to login successfully to the web page for TubeArchivist, you have successfully upgraded your container!
!!! note "If you did not use the latest tag for the tubearchivist container, then you will instead do the following:"
- Shut down the old container.
- Download the new image.
- Follow the Installation instructions again for just the TubeArchivist image, using the same configurations as the existing container. It'll have to be named slightly differently.
- After the image is now running and the upgrade of the backend files occurs, shut down the new container. Rename or delete the old container. Rename the new container to have the intended name.
!!! note "Links are incredibly important if you upgrade or change the ES or Redis container images. You will either need to remove the links, create the new containers, then re-add the links or rebuild all of the images with the same instructions as Installation, starting at Step 3."
If you're still having trouble, join us on discord and come to the #support channel.